 |
|
Contact Alex Chernov,
Certified Heater Mason
Member of MHA
WETT#8347
Tel. (519) 938-9166
Cell (416) 708-8139
alex_stovemaster(@)yahoo.ca
|
|
 |
|
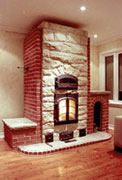
For the better understanding of how masonry heaters and stoves are constructed, we included a little story about one of our projects that show the whole process step by step.
- Discussion with the client about their needs and preferences. Functions, output, additional features, location, facing ideas.all is discussed. A couple of sketches are produced for the client's consideration by the end of the conversation.
- Final design decisions are made. We provide the client with an estimate.
- The job is scheduled; deposit is received. Hardware is ordered. Due to the fact that most of the hardware comes from Finland and not always is stocked by our supplier, it is highly recommended to order hardware at least a month ahead.
- Complete drawings for the project are created in the CAD software.
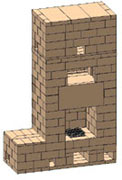
- Work is started at the location. We start with the layout of the heater's core on the slab. The firebrick core is then built using special refractory mortar. The bricks are laid on the edge. This way, the core's wall thickness is only 2" that facilitates ideal heat transfer into the facing.
- The firebox is built with floor slopping to the grate to eliminate necessity to move pieces of unburned wood and coals to the grate at the later stages of firing.
- Manufactured firebrick slabs or cast-in-place refractory slabs are used in the core to span openings and cap chambers. Small openings in the core are left for the clean-out doors. By-pass and shut-off dampers are installed on the go.
- If the heater will use an external or freestanding chimney, a flexible connection is made using sections of prefabricated stainless chimney and ceramic fiber insulation.
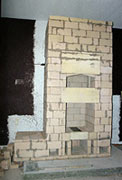
- The completed core is wrapped with cardboard or fiberglass fabric to create a ?" expansion joint between the core and facing. This joint takes expansion of the core and eliminates cracks in the facing.
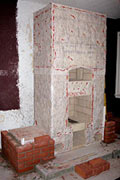
- The facing is started.
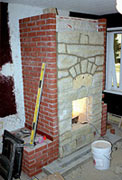
- The firebox doors are installed in the completed facing.
- Considering that the chimney is operational by this time, the heater is now ready for the test fire. The project is completed!
- Depending on the conditions, the heater may be left to dry out for a week or may be dried by setting up several small fires a day.
|
|
|
|
|
|
|